| Using the program |
|
|
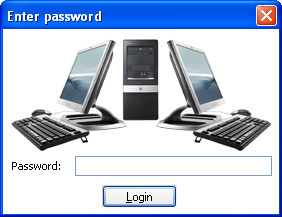
To configure a new seats you need to complete following steps: 1. Please, connect to the base unit an additional monitors, keyboards and mice. To connect additional mouse and keyboard use the USB-ports. If you don’t have an USB-mouse and keyboard, you can use the adapters USB <-> PS/2 to connect a conventional PS/2 mouse and keyboard to the USB-ports. 2. Start Friendly Seats. You will be prompted for a password (Fig. 4.1). When you first start the Friendly Seats a password is not specified, so this window will not appear.
Fig. 4.1. Window for entering the password
After entering the correct password the main window of Friendly Seats will appear (Fig. 3.1).
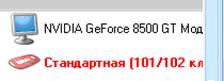
3. Determination of correspondence mice and keyboards in the list of "Components" to the real mice and keyboards. For this purpose (the order is not important) move all mice and press buttons on all keyboards. See the highlighted items in the list of "Components" (Fig. 4.2). If the item is highlighted by red color, it means that was detected the activity of the corresponding mouse or keyboard.
Fig. 4.2. Active elements of "Components" and "Seats" lists are highlighted by red color.
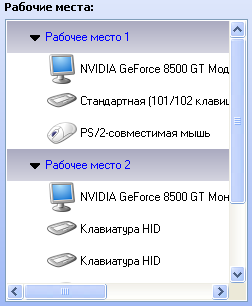
4. Binding monitors, keyboards and mice to seats. To bind the periferal device to the seat simply drag the appropriate element from the "Components" list to the corresponded seat in the "Seats" list (Fig. 4.3).
Fig. 4.3. The "Seats" list with the binded periphery.
Note. You can also use the buttons (see Fig. 4.4) instead of dragging. Select an element from the "Components" list and select the desired seat in "Seats" list, to which you want to bind this element, and click the button that points to "Seats" list. Unbinding is similar to binding, but you need click the button that points to "Components" list.
Fig. 4.4. Buttons for binding/unbinding of components to seats.
5. Adjust the settings of components and seats. Mode of mouse cursor can be configured in the "Monitors" tab (Fig. 3.2). Activate and configure the automatic logon you can in the "Autologin" tab (Fig. 3.3). Activate and configure the function of network address separation you can in the "Network" tab (Fig. 3.4). See "Application interface" for details on these tabs. 6. Setup of password protection. You can password-protect the program Friendly Seats and set a password on the forced shutdown of your computer in Administrator mode (see below). 7. Activate and configure multi-user extension. Enabling of multi-user extension is possible in two ways: 1) selecting item "Run at Windows startup" from the popup menu (Fig. 4.6), 2) selecting appropriate options in the "Multi-user extension" block of the "General Settings" window (Fig. 3.7) 8. Save settings and exit Friendly Seats. When all settings are made you need to save it. You can do this by clicking the button "Save and Exit" (Fig. 4.5).
Fig. 4.5. The button "Save and exit".
9. Restart the computer. In cases when you have made the settings that need to restart your computer to take effect, when clicking on the button "Save and Exit" you will see the message window with proposition of reboot. You will be asked to restart your computer immediately, or manually at a time that convenient for you.
If the Friendly Seats configuration program was previously executed and a multi-user extension is enabled but not started with Windows (Fig. 3.7), you can start it manually by clicking the Start button and selecting item "Start now" from the popup menu (Fig. 4.6).
Fig. 4.6. The Start button (a) and its context menu (b). Administrator Mode. If multi-user extension is enabled you will see special dialogue over the Windows Winlogon dialogue. You can see Windows Winlogon dialogue every time before user logon to system and after user exits the system. This special dialogue displayed by Friendly Seats and it is shown below (Fig. 4.7 a, b).
Fig. 4.7. The appearance of special Friendly Seats dialogue in two cases: password for forced shutdown is not specified (a), and this password is specified (b).
The appearance of this window depends on whether the password for forced shutdown is specified or not. If password for forced shutdown is not specified, the password field and a button "Administrator Mode" does not appear. Instead you'll see a warning that states that there are currently not all users have completed their work at other seats. Turning off the computer at this moment will rudely interrupt the work of other users. If a password for forced shutdown is specified, in order to shutdown your computer, you must first enter the password, click "Administrator Mode" and then click button "Turn Off Computer" of Windows Winlogon dialogue. |